FlowJo Authentication Issue with macOS Sequoia
USB drives not mounting for the OS
We have a few isolated reports that users are no longer able to authenticate FlowJo with their dongle after upgrading to macOS Sequoia.
The issue seems to be a Sequoia problem as the Dongle does not mount automatically after upgrade. It has nothing to do with the functionality of the Dongle or FlowJo. If the Dongle drive mounts and shows up in the Finder, then it is recognized and authenticates FlowJo properly. We've reported this to Apple.
General Troubleshooting
- Is the dongle mounting on your computer? If no, try plugging the dongle into a non-powered USB2 hub if you were originally plugging it into a powered USD3 connection.
- Is the dongle mounting on your computer? If yes, make sure that the dongle is named FJTHUMB and only has a license.key filed loaded onto it. If other files are loaded onto the dongle besides the license.key file, delete those files and then restart FlowJo.
Did the steps above not help? If so, there are two steps to take: first, force mount the dongle, then reformat the dongle for your Mac running macOS Sequoia. However, you must have sufficient Admin privileges to run these commands. If you do not have sufficient permissions, please contact your IT team so that they can assist you.
Instructions to force the OS to mount the dongle:
- Open Terminal app
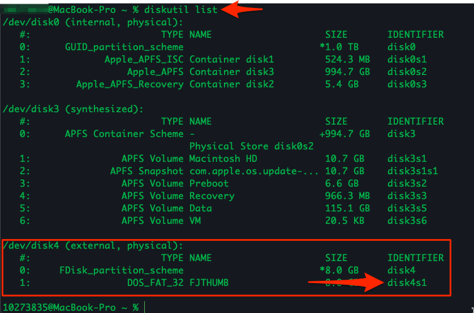
- Enter: diskutil list
- Press return
- View the list of mounted drives and find the "FJTHUMB" disk listed. Mine was under /dev/disk4. More specifically, its identifier was /dev/disk4s1. This is used in the following command to mount the drive below.
- Enter: sudo mkdir /Volumes/FJTHUMB
- Press return
- Enter admin password
- Enter: sudo mount -t msdos /dev/disk4s1 /Volumes/FJTHUMB
- Press return
- Enter admin password
*Note that you may need to change disk4s1 to a different device IDENTIFIER, depending on the diskutil list.

Once you have the dongle mounted, follow these instructions to reformat the dongle on your Mac running macOS Sequoia:
- Shutdown FlowJo.
- Connect the FlowJo Dongle to the USB port on your computer.
- Make a copy of the license.key file to your Desktop
- Open Disk Utility (Using the Finder, go to Application -> Utilities -> Disk Utility).
- Click to select the USB storage device in the left panel.
- Click to change to the Erase tab.
- Change (or keep) the name to “FJTHUMB”.
- In the Format selection box, click (exFAT).
- Click Erase.
- WARNING: Formatting the dongle will erase any personal files that have been added to the dongle.
- At the confirmation dialog, click the Erase button.
- Close the Disk Utility window.
- Copy and paste the license.key file onto the newly formatted FlowJo Dongle.
- Start FlowJo – the interface should now read Drag Samples Here. Congrats!
Try ejecting the dongle, then plugging it back in to confirm the process was successful. Please confirm which troubleshooting technique solved your issue by replying to the support person who sent you to this landing page.
Thank you,
The FlowJo Team.

